

Before you start: what indexing actually is and why your site may be invisible
You launched a new website. You type your company name into Google — and nothing. The site isn’t there. This isn’t a malfunction or an error. It simply means Google hasn’t indexed your website yet.
Indexing is the process by which Google’s robot (Googlebot) visits your site, analyzes its content and adds it to its enormous database — the index. Only after this step can your site appear in search results.
The whole process consists of three stages:
- Crawling — Googlebot “visits” your site and fetches its content
- Rendering — Google processes the HTML, CSS and JavaScript to understand what the user sees
- Indexing — the content enters the database and can appear in results
Each of these stages can fail — and for different reasons. In this article we’ll go through all of them.
How long does it take to index a new website?
This is the question we hear most from clients. The honest answer: from a few hours to several weeks.
Two variables matter: domain authority and link availability. A new site with no history and no external links can wait 2–6 weeks for first indexing. A site that has even one link from a trusted, already-indexed source can appear in Google within hours of that link being published.
There are no guarantees or fixed schedules — Google decides when and how often to visit specific domains. What you can do is make that job as easy as possible. That’s what we’ll cover now.
Step 1: Check whether your site is visible to Google at all
Before you take action, diagnose the situation. Use the site: operator in Google:
site:yourwebsite.comIf results show pages from your domain — you’re already in the index, at least partially. If the result is zero — your site is not indexed.
Second test: enter the full URL in Google’s search bar in quotes:
"https://yourwebsite.com/services/"If Google knows this URL, it will appear in results. If not — this specific page is not yet indexed.
Step 2: Set up Google Search Console — this is the absolute foundation
Google Search Console (GSC) is a free Google tool that gives you direct insight into how Google sees your site. Without it you’re working blind.
How to add your site to Google Search Console
- Go to search.google.com/search-console
- Click “Add property”
- Choose the property type — “Domain” is recommended (covers all versions: www, non-www, http and https)
- Verify site ownership using one of the available methods (recommended: DNS record or HTML file)
Use the “Inspect URL” feature
This is your direct communication channel with Googlebot. In GSC:
- Paste the URL of your homepage or a specific page into the bar at the top
- Click “Inspect URL”
- If Google doesn’t know the page yet, you’ll see “URL is not on Google”
- Click “Request indexing”
Google will place this URL in the crawl queue. The effect is typically visible within 24–72 hours.
Important limitation: you can submit a few URLs per day this way. There’s no point trying to submit hundreds of pages manually — that’s what sitemaps are for.
Step 3: Create and submit an XML sitemap
A sitemap is an XML file containing a list of all your site’s URLs. It’s like a table of contents for Googlebot — it tells it: “visit these addresses, all my content is here”.
What a good sitemap should contain
The minimum requirement is simply a list of URLs:
<?xml version="1.0" encoding="UTF-8"?>
<urlset xmlns="http://www.sitemaps.org/schemas/sitemap/0.9">
  <url>
    <loc>https://yourwebsite.com/</loc>
    <lastmod>2026-03-01</lastmod>
  </url>
  <url>
    <loc>https://yourwebsite.com/services/</loc>
    <lastmod>2026-02-15</lastmod>
  </url>
</urlset>
The <lastmod> tag is the only value Google actually considers when setting crawl priority. Include it for every URL.
What NOT to put in a sitemap
- Error pages (403, 404, 500)
- Search results pages (e.g.
/search/,?q=) - Terms of service and privacy policy (wastes crawl budget)
- Pagination pages (e.g.
/page/2/) — unless they have unique content - Tag and archive pages without their own valuable content
How to submit a sitemap in GSC
- In the GSC panel go to “Sitemaps” in the left menu
- Enter the path to your sitemap (e.g.
sitemap.xmlorsitemap-0.xml) - Click “Submit”
GSC will show you the status: how many URLs were discovered and how many were indexed. This is the key metric to monitor.
How to generate a sitemap on popular platforms
- WordPress with Yoast SEO or RankMath plugin: sitemap is generated automatically, typically at
/sitemap.xml - WordPress without a plugin: WordPress’s built-in sitemap from version 5.5 at
/wp-sitemap.xml - Webflow: automatic sitemap at
/sitemap.xml, managed in project settings - Squarespace: generated automatically, enabled by default
- Custom site: use the xml-sitemaps.com generator (up to 500 URLs free) or Screaming Frog
Step 4: Check robots.txt — the most common reason for invisibility
The robots.txt file is an instruction for search engine bots: what they can and cannot crawl. One incorrect entry can block your entire site — and this happens more often than you’d think.
Check your file by entering in your browser:
yourwebsite.com/robots.txtA correct robots.txt for a site you want fully indexed looks like this:
User-agent: *
Allow: /

Sitemap: https://yourwebsite.com/sitemap.xml
robots.txt errors that block indexing
Error 1 — blocking the entire site:
User-agent: *
Disallow: /
This is a classic mistake when launching a site from a test environment. Many CMSes have a “don’t index this site” option (visible in WordPress under Settings → Reading) — and it sometimes gets accidentally left enabled in production.
Error 2 — blocking important sections:
Disallow: /services/
Disallow: /blog/
If you see entries like these and these pages should be visible in Google — remove them immediately or change to Allow.
Step 5: Take care of internal links — Google discovers pages through links
Googlebot moves around the internet by following links. If a new page has no links to it from an already-indexed page, Googlebot may simply not find it — even if it’s in the sitemap.
Rules for good internal linking
- The homepage should link (directly or through menus) to all key sections
- Every new blog post should contain links to at least 2–3 other pages
- If you publish a new service page, add a link to it from the homepage and related articles
- Use descriptive anchor texts — instead of “click here” write “read our guide on SEO”
Internal linking isn’t just about indexing — it’s also a signal to Google about which pages are most important to you.
Step 6: Get external links (backlinks) — the fastest signal for Google
One link from a trusted, indexed site does more for a new domain than weeks of waiting. Why? Because Googlebot regularly crawls popular sites — and when it finds a link to you there, it will follow it.
Realistic sources of first backlinks for a new business
- Google Business Profile listing — free, almost instant
- LinkedIn — publish a post with a link to your site or add the URL to your company profile
- Industry directories — e.g. Yelp (for local businesses), niche directories
- Business partners — ask for a mention or link in a footer or on a partners page
- Local portals and media — press release on company launch, local industry blogs
- GitHub/Behance/Dribbble profile — if you work in tech or creative industries
You don’t need dozens of links. At the start, quality matters — and giving Googlebot a way to “find” you.
Step 7: Make sure your site meets the basic technical requirements
Google doesn’t index sites that are technically problematic. Here’s a checklist:
SSL certificate (HTTPS)
Your site must work at an https:// address. If you still see http:// without a padlock — Google treats that site as untrustworthy. An SSL certificate is today’s standard and can be obtained for free (Let’s Encrypt).
Page load speed
Google crawls pages faster when they load quickly. Slow servers increase so-called crawl budget drain — the bot wastes time waiting instead of crawling. Check your site at PageSpeed Insights.
Target: Core Web Vitals in the green, LCP below 2.5s.
Mobile responsiveness
Google indexes sites in “mobile-first” mode — meaning it first analyzes the mobile version. If your site doesn’t work properly on phones, you may have indexing issues.
Avoiding noindex tags
Check the source code of key pages (Ctrl+U in browser) and search for the phrase noindex. If you find such a tag on a page you want indexed — remove it.
<!-- This tag BLOCKS indexing — remove it if it's there by mistake -->
<meta name="robots" content="noindex, nofollow">
Canonical tags
Canonical tells Google: “the original version of this content is here”. Make sure the canonical points to the correct URL — an incorrect canonical can redirect Google to a different page than the one you want indexed.
Step 8: Monitor progress in Google Search Console
After completing the above steps, nothing remains but to wait and monitor. GSC gives you all the tools you need for this.
Key reports to track
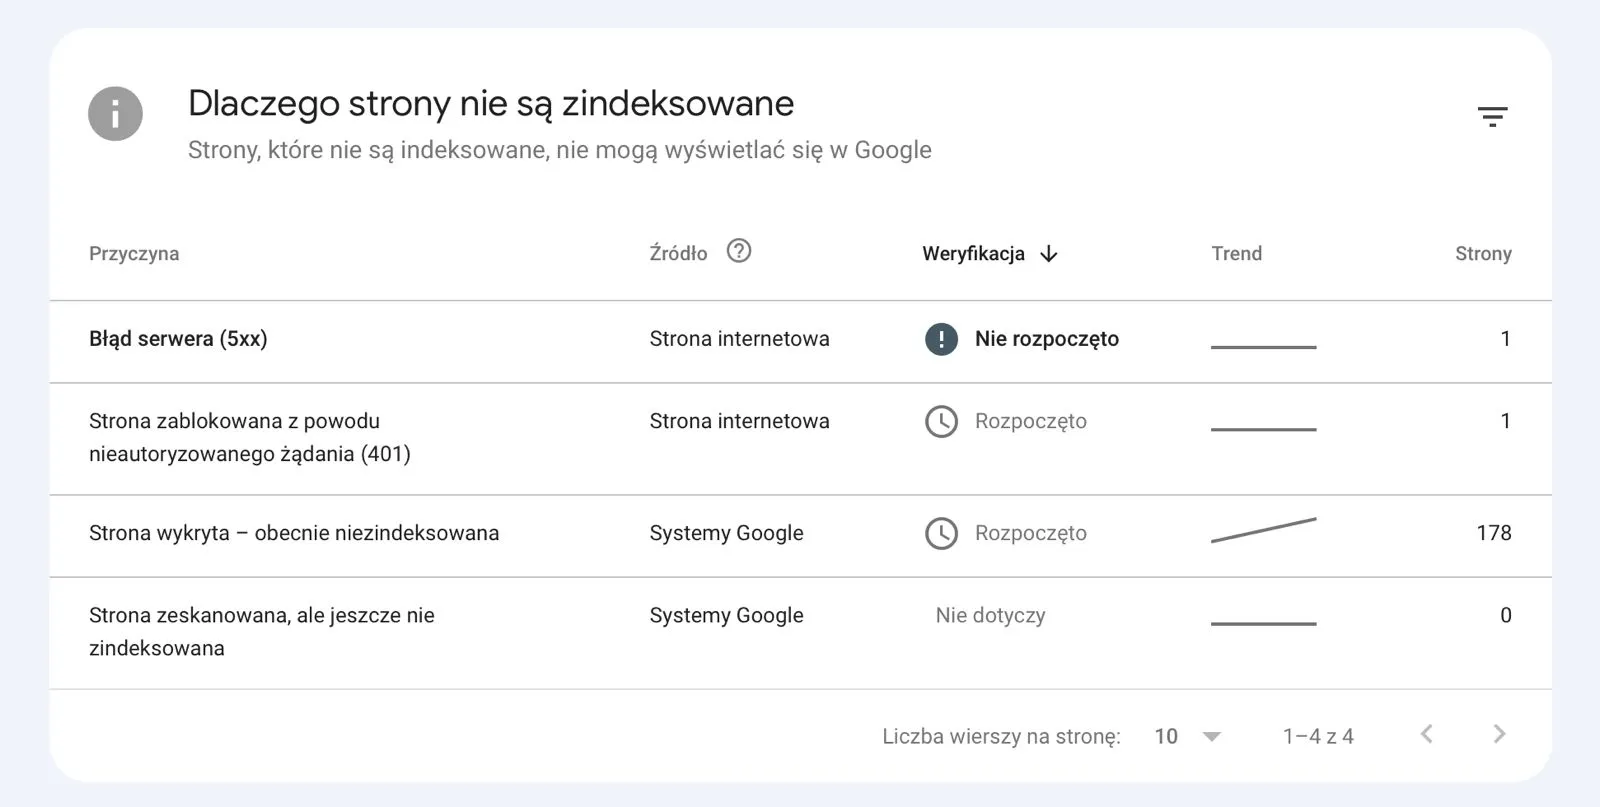
“Page indexing” report (left menu → Indexing → Pages): Here you’ll see a breakdown of indexed and non-indexed pages, along with the reason for lack of indexing. The most common statuses for new pages:
- “Discovered — currently not indexed” — Google knows about the page but hasn’t visited it yet. Wait or manually submit the URL.
- “Crawled — currently not indexed” — Google visited the page but decided not to index it. May indicate content quality issues or duplicates.
- “Redirect” — the page redirects elsewhere. Check whether the redirect is intentional.
- “Page with noindex tag” — as described above. Remove the tag.

“Sitemaps” report: Shows how many URLs were submitted and how many Google has indexed. The difference between these numbers is your task to investigate.
“Performance” report: When the first pages start appearing in results, you’ll see data on clicks, impressions and positions here. This is your measure of success.
Checklist: Index your new site step by step
Below is a full checklist — go through it after launching any new site:
Preparation:
- Check robots.txt — make sure you’re not blocking crawling
- Check that no noindex tag is enabled on key pages
- Ensure the site works on HTTPS (padlock in browser)
- Check mobile responsiveness (DevTools in Chrome, F12 → phone icon)
Google Search Console:
- Add the site to GSC and verify ownership
- Create and submit an XML sitemap
- Use the “Inspect URL” feature for the homepage and 5–10 key pages
- Check the “Page indexing” report — remove 4xx errors, fix redirects
Links:
- Add the site to Google Business Profile
- Publish a link on LinkedIn (company profile)
- Add the site URL to at least one industry directory
- Check internal links — are all key pages linked from the menu or homepage
Technical:
- Check PageSpeed Insights — aim for LCP < 2.5s
- Ensure canonical tags point to the correct URLs
- Remove error pages, terms, and search results from the sitemap
Monitoring:
- Set a reminder for 7 days — check the indexing report in GSC
- Set a reminder for 30 days — assess progress and address pages still not indexed
Tools that will actually help
Google Search Console (free)
An absolute must-have. Without GSC you have no insight into how Google sees your site. Setup takes 15 minutes.
Google PageSpeed Insights (free)
Checks page speed and Core Web Vitals — metrics that affect both indexing and rankings.
Screaming Frog SEO Spider (free up to 500 URLs)
Professional tool for crawling your site — detects 404 errors, broken redirects, missing meta tags, canonical issues and much more. Used by most SEO agencies worldwide.
Google Rich Results Test (free)
Checks structured data (schema.org) — whether Google can “understand” your content and display it as a rich result (enhanced result with stars, FAQ, etc.).
XML-Sitemaps.com (free up to 500 URLs)
XML sitemap generator for sites without a CMS or with CMSes that don’t generate sitemaps automatically.
Ahrefs Webmaster Tools (free for site owners)
After ownership verification, gives access to basic backlink and crawl reports — very useful when diagnosing indexing issues caused by a lack of external links.
Most common mistakes that block indexing of new sites
Over years of working with clients, we’ve seen the same mistakes repeatedly. Here’s a list of the most frequent ones:
Mistake 1: Test site with “noindex” enabled goes live
While building a site, the developer enables an indexing block (robots.txt or noindex tag) so Google doesn’t index the unfinished version. The problem? Often nobody disables this block before launch. Check this as your first step.
Mistake 2: Sitemap contains pages that shouldn’t be indexed
Terms of service, privacy policy, search pages, pagination pages — all of this wastes crawl budget. Google has limited resources it allocates to crawling each domain. If half the sitemap is “junk” URLs, bots spend less time on important pages.
Mistake 3: No internal links to new pages
A new page added to the CMS but with no links to it from other pages — this is called an orphan page. Googlebot won’t find it even if it’s in the sitemap, because there’s no crawl path to it.
Mistake 4: Duplicate URLs without proper canonicals
If the same content is accessible under multiple URLs (e.g. with www and without, with and without a trailing slash, with and without parameters), Google may treat these as duplicates and decide not to index any of them.
Mistake 5: Waiting without monitoring
“We launched the site a week ago and nothing’s happening.” Business owners often wait passively without checking GSC. Meanwhile, GSC may be showing specific errors from day one — giving a clear answer as to why the site isn’t being indexed.
FAQ — frequently asked questions
How long does it take to index a new website?
From a few hours to several weeks. It mainly depends on whether the site has external links (which shorten the time) and how large the crawl budget is (which depends on domain authority). Sites with no backlinks at all can wait 4–6 weeks.
Do I have to pay to get Google to index my site?
No. Organic indexing is 100% free. Google Ads paid campaigns don’t affect organic indexing and don’t speed it up.
My site is indexed, but it doesn’t appear on the first page. Why?
Indexing and ranking are two different things. An indexed page is in Google’s database, but its position depends on hundreds of ranking factors (content quality, backlinks, UX, speed). That’s a task for SEO, not just indexing.
I submitted a sitemap in GSC, but Google only indexed some pages. What to do?
Check the “Page indexing” report in GSC — every non-indexed page has an assigned reason. Most common: “Discovered — currently not indexed” (wait or manually submit) and “Duplicate page without canonical” (fix canonical tags).
Can I speed up indexing without backlinks?
Yes, but with limitations. Manually submitting a URL in GSC, a proper sitemap and no technical errors maximize the chances. But backlinks from external sites are still the most effective accelerator for a new domain.
What is crawl budget and should I worry about it?
Crawl budget is the number of pages Googlebot is willing to review on your domain in a given time. For small sites (up to a few hundred pages) it’s generally not an issue. It becomes important for large sites (thousands of URLs) or when the sitemap contains many unnecessary addresses.
I changed the URL of a page. Do I need to re-index it?
Yes. When changing a URL, you need to set up a 301 redirect from the old to the new address, update the sitemap and submit the new URL in GSC. A 301 redirect passes the “SEO value” from the old address to the new one.
Have questions about indexing your site? Contact us — at ideavo.io we help businesses not only build a site, but also make sure Google finds and displays it.